SpringBoot Web开发

The scabbard is content to be dull when it protects the keenness of the sword.

刀鞘保护刀的锋利,它自己则满足于它的迟钝。

SpringBoot Web开发

SpringMVCSpringMVC 是 Spring 提供的一个基于 MVC 设计模式的轻量级 Web 开发框架,其本身就是 Spring 框架的一部分,可以与 Spring 无缝集成,性能方面具有先天的优越性,是当今业界最主流的 Web 开发框架之一。

SpringBoot 是在 Spring 的基础上创建一款开源框架,它提供了 spring-boot-starter-web(Web 场景启动器) 来为 Web 开发予以支持。spring-boot-starter-web 为我们提供了嵌入的 Servlet 容器以及 SpringMVC 的依赖,并为 SpringMVC 提供了大量自动配置,可以适用于大多数 Web 开发场景。


### 静态资源导入

在 Web 应用中会涉及到大量的静态资源,例如 JS、CSS 和 HTML 等。我们知道,Spring MVC 导入静态资源文件时,需要配置静态资源的映射;但在 SpringBoot 中则不再需要进行此项配置,因为 SpringBoot 已经默认完成了这一工作。

Spring Boot 默认为我们提供了 3 种静态资源映射规则:

1. WebJars 映射
2. 默认资源映射
3. 静态首页(欢迎页)映射


#### WebJars 映射

WebJars 可以将 Web 前端资源(JS,CSS 等)打成一个个的 Jar 包,然后将这些 Jar 包部署到 Maven 中央仓库中进行统一管理,当 Spring Boot 项目中需要引入 Web 前端资源时,只需要访问 WebJars 官网,找到所需资源的 pom 依赖,将其导入到项目中即可。

所有通过 WebJars 引入的前端资源都存放在当前项目类路径(classpath)下的“/META-INF/resources/webjars/” 目录中。


#### 默认静态资源映射

当访问项目中的任意资源(即“/”)时,SpringBoot 会默认从以下路径中查找资源文件(优先级依次降低):

1. classpath:/META-INF/resources/
2. classpath:/resources/
3. classpath:/static/
4. classpath:/public/

这些路径又被称为静态资源文件夹,它们的优先级顺序为:classpath:/META-INF/resources/ > classpath:/resources/ > classpath:/static/ > classpath:/public/ 。

当我们请求某个静态资源(即以“.html”结尾的请求)时,SpringBoot 会先查找优先级高的文件夹,再查找优先级低的文件夹,直到找到指定的静态资源为止。


#### 静态首页(欢迎页)映射

静态资源文件夹下的所有 index.html 被称为静态首页或者欢迎页,它们会被被 `/
映射,换句话说就是,当我们访问/或者/index.html时,都会跳转到静态首页(欢迎页)。 ### Thymeleaf [官方网站](https://www.thymeleaf.org) [官方文档](https://www.thymeleaf.org/doc/tutorials/3.0/usingthymeleaf.html) Thymeleaf 是一款用于渲染 XML/XHTML/HTML5 内容的模板引擎。它与 JSP,Velocity,FreeMaker 等模板引擎类似,也可以轻易地与 SpringMVC 等 Web 框架集成。与其它模板引擎相比,Thymeleaf 最大的特点是,即使不启动 Web 应用,也可以直接在浏览器中打开并正确显示模板页面 。 Thymeleaf 支持 HTML 原型,其文件后缀为.html`,因此它可以直接被浏览器打开,此时浏览器会忽略未定义的 Thymeleaf 标签属性,展示 thymeleaf 模板的静态页面效果;当通过 Web 应用程序访问时,Thymeleaf 会动态地替换掉静态内容,使页面动态显示。

#### 依赖

使用thymeleaf,Maven导入依赖

1
2
3
4
5
6
7
8
 <dependency>
<groupId>org.thymeleaf</groupId>
<artifactId>thymeleaf-spring5</artifactId>
</dependency>
<dependency>
<groupId>org.thymeleaf.extras</groupId>
<artifactId>thymeleaf-extras-java8time</artifactId>
</dependency>

我们要将html放在我们的templates目录下

Thymeleaf 的特点

Thymeleaf 模板引擎具有以下特点:

  • 动静结合:Thymeleaf 既可以直接使用浏览器打开,查看页面的静态效果,也可以通过 Web 应用程序进行访问,查看动态页面效果。
  • 开箱即用:Thymeleaf 提供了 Spring 标准方言以及一个与 SpringMVC 完美集成的可选模块,可以快速的实现表单绑定、属性编辑器、国际化等功能。
  • 多方言支持:它提供了 Thymeleaf 标准和 Spring 标准两种方言,可以直接套用模板实现 JSTL、 OGNL 表达式;必要时,开发人员也可以扩展和创建自定义的方言。
  • 与 SpringBoot 完美整合:SpringBoot 为 Thymeleaf 提供了的默认配置,并且还为 Thymeleaf 设置了视图解析器,因此 Thymeleaf 可以与 Spring Boot 完美整合。

标准表达式语法

Thymeleaf 模板引擎支持多种表达式:

  • 变量表达式:${…}

    • 获取对象的属性和方法
    • 使用内置的基本对象
      • #ctx :上下文对象;
      • #vars :上下文变量;
      • #locale:上下文的语言环境;
      • #request:HttpServletRequest 对象(仅在 Web 应用中可用);
      • #response:HttpServletResponse 对象(仅在 Web 应用中可用);
      • #session:HttpSession 对象(仅在 Web 应用中可用);
      • #servletContext:ServletContext 对象(仅在 Web 应用中可用)。
    • 使用内置的工具对象
  • 选择变量表达式:*{…}

    • 选择变量表达式与变量表达式功能基本一致,只是在变量表达式的基础上增加了与 th:object 的配合使用。当使用 th:object 存储一个对象后,我们可以在其后代中使用选择变量表达式*{...}获取该对象中的属性,其中,* 即代表该对象。

    • `html

      <p th:text="*{fisrtName}">firstname</p>
      

      1
      2
      3
      4
      5
      6
      7
      8
      9
      10
      11
      12
      13
      14
      15
      16
      17
      18
      19
      20
      21
      22
      23
      24
      25
      26
      27
      28
      29
      30
      31
      32
      33
      34
      35
      36
      37
      38
      39
      40
      41
      42
      43
      44
      45
      46
      47
      48
      49
      50
      51
      52
      53
      54
      55
      56
      57
      58
      59
      60
      61
      62
      63
      64
      65
      66
      67
      68
      69
      70
      71
      72
      73
      74
      75
      76
      77
      78
      79
      80
      81
      82
      83
      84
      85
      86
      87
      88

      - 链接表达式:@{...}

      - 不管是静态资源的引用,还是 form 表单的请求,凡是链接都可以用链接表达式 `@{...}`。 链接表达式的形式结构如下: 无参请求:@{/xxx} 有参请求:@{/xxx(k1=v1,k2=v2)}

      - 国际化表达式:#{...}

      - 片段引用表达式:~{...}

      - 推荐:~{templatename::fragmentname}
      - 支持:~{templatename::#id}
      - templatename:模版名,Thymeleaf 会根据模版名解析完整路径:/resources/templates/templatename.html,要注意文件的路径。
      - fragmentname:片段名,Thymeleaf 通过 th:fragment 声明定义代码块,即:th:fragment="fragmentname"
      - id:HTML 的 id 选择器,使用时要在前面加上 # 号,不支持 class 选择器。

      #### th 属性

      | 属性 | 描述 |
      | :-------: | :----------------------------------------------------------: |
      | th:id | 替换 HTML 的 id 属性 |
      | th:text | 文本替换,转义特殊字符 |
      | th:utext | 文本替换,不转义特殊字符 |
      | th:each | 遍历,支持 Iterable、Map、数组等。 |
      | th:object | 在父标签选择对象,子标签使用 *{…} 选择表达式选取值。 没有选择对象,那子标签使用选择表达式和 ${…} 变量表达式是一样的效果。 同时即使选择了对象,子标签仍然可以使用变量表达式。 |
      | th:with | 局部变量赋值运算 |
      | th:if | 根据条件判断是否需要展示此标签 |
      | th:unless | 和 th:if 判断相反,满足条件时不显示 |


      ### SpringBoot定制SpringMVC

      SpringBoot 抛弃了传统 xml 配置文件,通过配置类(标注 @Configuration 的类,相当于一个 xml 配置文件)以 JavaBean 形式进行相关配置。

      SpringBoot 对 SpringMVC 的自动配置可以满足我们的大部分需求,但是我们也可以通过自定义配置类(标注 @Configuration 的类)并实现 WebMvcConfigurer 接口来定制 Spring MVC 配置,

      在 Spring Boot 项目中,我们可以通过以下 2 中形式定制 Spring MVC:

      - 扩展 Spring MVC
      - 全面接管 Spring MVC

      #### 扩展 SpringMVC

      如果 SpringBoot 对 SpringMVC 的自动配置不能满足我们的需要,我们还可以通过自定义一个 WebMvcConfigurer 类型(**实现 WebMvcConfigurer 接口**)的配置类(**标注 @Configuration,但不标注 @EnableWebMvc** 注解的类),来扩展 SpringMVC。这样不但能够保留 SpringBoot 对 SpringMVC 的自动配置,享受 SpringBoot 自动配置带来的便利,还能额外增加自定义的 SpringMVC 配置。

      #### 全面接管 SpringMVC

      在一些特殊情况下,我们可能需要抛弃 SpringBoot 对 SpringMVC 的全部自动配置,完全接管 SpringMVC。此时我们可以自定义一个 WebMvcConfigurer 类型(**实现 WebMvcConfigurer 接口**)的配置类,并在该类上**标注 @EnableWebMvc 注解**,来实现完全接管 Spring MVC。


      ### 国际化

      国际化(Internationalization 简称 I18n,其中“I”和“n”分别为首末字符,18 则为中间的字符数)是指软件开发时应该具备支持多种语言和地区的功能。换句话说就是,开发的软件需要能同时应对不同国家和地区的用户访问,并根据用户地区和语言习惯,提供相应的、符合用具阅读习惯的页面和数据,例如,为中国用户提供汉语界面显示,为美国用户提供提供英语界面显示。

      在 Spring 项目中实现国际化,通常需要以下 3 步:

      1. 编写国际化资源(配置)文件;
      2. 使用 ResourceBundleMessageSource 管理国际化资源文件;
      3. 在页面获取国际化内容。
      4.

      #### 编写国际化资源文件

      在 Spring Boot 的类路径下创建国际化资源文件,文件名格式为:基本名_语言代码_国家或地区代码,例如 login_en_US.properties、login_zh_CN.properties。

      在 src/main/resources 下创建一个 i18n 的目录,并在该目录中按照国际化资源文件命名格式分别创建以下三个文件,

      - login.properties:无语言设置时生效
      - login_en_US.properties :英语时生效
      - login_zh_CN.properties:中文时生效

      以上国际化资源文件创建完成后,IDEA 会自动识别它们,并转换成如下的模式:

      ![image-20220219143717888](SpringBoot-Web开发/image-20220219143717888.png)

      打开任意一个国际化资源文件,并切换为 Resource Bundle 模式,然后点击“+”号,创建所需的国际化属性


      #### 使用 ResourceBundleMessageSource 管理国际化资源文件

      SpringBoot 已经对 ResourceBundleMessageSource 提供了默认的自动配置。

      只需要在 SpringBoot 全局配置文件中,使用配置参数`spring.messages.basename`指定我们自定义的国际资源文件的基本名即可,代码如下(当指定多个资源文件时,用逗号分隔)。

      ```properties
      spring.messages.basename=i18n.login

获取国际化内容

由于页面使用的是 Tymeleaf 模板引擎,因此我们可以通过表达式 #{…} 获取国际化内容。

1
2
3
<button class="btn btn-lg btn-primary btn-block" type="submit" th:text="#{login.btn}">Sign in</button>
<a class="btn btn-sm" th:href="@{index.html(l='zh_CN')}">中文</a>
<a class="btn btn-sm" th:href="@{index.html(l='en_US')}">English</a>

SpringBoot拦截器

在 Spring Boot 项目中,使用拦截器功能通常需要以下 3 步:

  1. 定义拦截器;
  2. 注册拦截器;
  3. 指定拦截规则(如果是拦截所有,静态资源也会被拦截)。

定义拦截器

在 SpringBoot 中定义拦截器十分的简单,只需要创建一个拦截器类,并实现 HandlerInterceptor 接口即可。

HandlerInterceptor 接口中定义以下 3 个方法,如下表。

返回值类型 方法声明 描述
boolean preHandle(HttpServletRequest request, HttpServletResponse response, Object handler) 该方法在控制器处理请求方法前执行,其返回值表示是否中断后续操作,返回 true 表示继续向下执行,返回 false 表示中断后续操作。
void postHandle(HttpServletRequest request, HttpServletResponse response, Object handler, ModelAndView modelAndView) 该方法在控制器处理请求方法调用之后、解析视图之前执行,可以通过此方法对请求域中的模型和视图做进一步修改。
void afterCompletion(HttpServletRequest request, HttpServletResponse response, Object handler, Exception ex) 该方法在视图渲染结束后执行,可以通过此方法实现资源清理、记录日志信息等工作。
1
2
3
4
5
6
7
8
9
10
11
12
13
14
15
16
17
18
19
20
import org.springframework.web.servlet.HandlerInterceptor;
import javax.servlet.http.HttpServletRequest;
import javax.servlet.http.HttpServletResponse;

public class LoginHandlerInterceptor implements HandlerInterceptor {
@Override
public boolean preHandle(HttpServletRequest request, HttpServletResponse response, Object handler) throws Exception {

//登录成功 有用户的session
Object loginUser = request.getSession().getAttribute("loginUser");
//没有登录
if (loginUser==null){
request.setAttribute("msg","没有权限,请先登录");
request.getRequestDispatcher("/index.html").forward(request,response);
return false;
}else {
return true;
}
}
}

注册拦截器

创建一个实现了 WebMvcConfigurer 接口的配置类(使用了 @Configuration 注解的类),重写 addInterceptors() 方法,并在该方法中调用 registry.addInterceptor() 方法将自定义的拦截器注册到容器中。

1
2
3
4
5
6
7
8
9
10
11
12
13
import org.springframework.context.annotation.Configuration;
import org.springframework.web.servlet.config.annotation.InterceptorRegistry;
import org.springframework.web.servlet.config.annotation.ViewControllerRegistry;
import org.springframework.web.servlet.config.annotation.WebMvcConfigurer;
//@Configuration标注在类上,相当于把该类作为spring的xml配置文件中的<beans>,作用为:配置spring容器(应用上下文)
@Configuration
public class MyMvcConfig implements WebMvcConfigurer {

@Override
public void addInterceptors(InterceptorRegistry registry) {
registry.addInterceptor(new LoginHandlerInterceptor());
}
}

指定拦截规则

在使用 registry.addInterceptor() 方法将拦截器注册到容器中后,我们便可以继续指定拦截器的拦截规则了。

1
2
3
registry.addInterceptor(new LoginHandlerInterceptor())
.addPathPatterns("/**")
.excludePathPatterns("/index.html","/","/user/login");

在指定拦截器拦截规则时,调用了两个方法,这两个方法的说明如下:

  • addPathPatterns:该方法用于指定拦截路径,例如拦截路径为“/**”,表示拦截所有请求,包括对静态资源的请求。
  • excludePathPatterns:该方法用于排除拦截路径,即指定不需要被拦截器拦截的请求。

SpringBoot JDBC访问数据库

进行JDBC配置:

  1. 在 pom.xml 中导入 JDBC 场景启动器:spring-boot-starter-data-jdbc
  2. JDBC 的场景启动器中并没有导入数据库驱动,我们需要根据自身的需求引入所需的数据库驱动。
  3. 在导入了 JDBC 场景启动器和数据库驱动后,接下来我们就可以在配置文件(application.properties/yml)中配置数据源了

SpringBoot整合MyBatis

MyBatis 是一个半自动化的 ORM 框架,所谓半自动化是指 MyBatis 只支持将数据库查出的数据映射到 POJO 实体类上,而实体到数据库的映射则需要我们自己编写 SQL 语句实现,相较于Hibernate 这种完全自动化的框架,Mybatis 更加灵活,我们可以根据自身的需求编写 sql 语句来实现复杂的数据库操作。

进行MyBatis配置:

  1. 在项目的 pom.xml 中引入 mybatis-spring-boot-starter 的依赖
  2. 在 SpringBoot 的配置文件(application.properties/yml)中对 MyBatis 进行配置,例如指定 mapper.xml 的位置、实体类的位置、是否开启驼峰命名法等等

SpringSecurity

SpringSecurity 是 Spring 家族中的一个安全管理框架,实际上,在 SpringBoot 出现之前,SpringSecurity 就已经发展了多年了,但是使用的并不多,安全管理这个领域,一直是 Shiro 的天下。

Apache Shiro
一个功能强大且易于使用的Java安全框架,提供了认证、授权、加密、会话管理。
Spring Security
Spring家族的一员,是一个能够为基于Spring的企业应用系统提供声明式的安全访问控制解决方案的安全框架。它提供了一组可以在Spring应用上下文中配置的Bean,充分利用了Spring的IOC(控制反转)、DI(依赖注入)和AOP(面向切面编程)功能,为应用系统提供声明式的安全访问控制功能,为了减少企业系统安全控制编写大量重复代码的工作。

SpringSecurity配置

通过SpringSecurity 对不同用户角色进行授权

1
2
3
4
5
6
7
8
9
10
11
12
13
14
15
16
17
18
19
20
21
22
23
24
25
26
27
28
29
30
31
32
33
34
35
36
37
38
39
40
41
42
43
44
45
46
import org.springframework.security.config.annotation.authentication.builders.AuthenticationManagerBuilder;
import org.springframework.security.config.annotation.web.builders.HttpSecurity;
import org.springframework.security.config.annotation.web.configuration.EnableWebSecurity;
import org.springframework.security.config.annotation.web.configuration.WebSecurityConfigurerAdapter;
import org.springframework.security.crypto.bcrypt.BCryptPasswordEncoder;


@EnableWebSecurity
public class SecurityConfig extends WebSecurityConfigurerAdapter {
//链式编程
@Override
protected void configure(HttpSecurity http) throws Exception {
//首页所有人可以访问 ,功能也只有对应有权限的人才能反应

//请求授权的规则
http.authorizeRequests().antMatchers("/").permitAll()
.antMatchers("/level1/**").hasRole("vip1")
.antMatchers("/level2/**").hasRole("vip2")
.antMatchers("/level3/**").hasRole("vip3");

//没有权限默认到登录页面 需要开启登录的页面
http.formLogin().loginPage("/toLogin");

//防止网站攻击 get post
//http.csrf().disable(); //关闭请求跨站攻击

//注销 注销完成跳转到首页
http.logout().logoutSuccessUrl("/");

//开启记住我功能 cookie 自定义接收前端的参数
http.rememberMe().rememberMeParameter("remember");
}

//认证
//密码编码:passwordEncoder
//springSecurity 5.0+ 新增了很多加密方法
@Override
protected void configure(AuthenticationManagerBuilder auth) throws Exception {
auth.inMemoryAuthentication().passwordEncoder(new BCryptPasswordEncoder())
.withUser("bobo").password(new BCryptPasswordEncoder().encode("123456")).roles("vip2","vip3")
.and()
.withUser("root").password(new BCryptPasswordEncoder().encode("123456")).roles("vip1","vip2","vip3")
.and()
.withUser("guest").password(new BCryptPasswordEncoder().encode("123456")).roles("vip1");
}
}

shiro

官方文档

Apache Shiro 是一个强大灵活的开源安全框架,可以完全处理身份验证、授权、加密和会话管理。

Shiro 可以非常容易的开发出足够好的应用,其不仅可以用在 JavaSE 环境,也可以用在 JavaEE 环境。Shiro 可以帮助我们完成:认证、授权、加密、会话管理、与 Web 集成、缓存等。

  • Authentication:身份认证 / 登录,验证用户是不是拥有相应的身份;
  • Authorization:授权,即权限验证,验证某个已认证的用户是否拥有某个权限;即判断用户是否能做事情,常见的如:验证某个用户是否拥有某个角色。或者细粒度的验证某个用户对某个资源是否具有某个权限;
  • Session Management:会话管理,即用户登录后就是一次会话,在没有退出之前,它的所有信息都在会话中;会话可以是普通 JavaSE 环境的,也可以是如 Web 环境的;
  • Cryptography:加密,保护数据的安全性,如密码加密存储到数据库,而不是明文存储;
  • Web Support:Web 支持,可以非常容易的集成到 Web 环境;
  • Caching:缓存,比如用户登录后,其用户信息、拥有的角色 / 权限不必每次去查,这样可以提高效率;
  • Concurrency:shiro 支持多线程应用的并发验证,即如在一个线程中开启另一个线程,能把权限自动传播过去;
  • Testing:提供测试支持;
  • Run As:允许一个用户假装为另一个用户(如果他们允许)的身份进行访问;
  • Remember Me:记住我,这个是非常常见的功能,即一次登录后,下次再来的话不用登录了。

从外部

应用代码直接交互的对象是 Subject,也就是说 Shiro 的对外 API 核心就是 Subject

  • Subject:主体,代表了当前 “用户”,这个用户不一定是一个具体的人,与当前应用交互的任何东西都是 Subject,即一个抽象概念;所有 Subject 都绑定到 SecurityManager,与 Subject 的所有交互都会委托给 SecurityManager;可以把 Subject 认为是一个门面;SecurityManager 才是实际的执行者;

  • SecurityManager:安全管理器;即所有与安全有关的操作都会与 SecurityManager 交互;且它管理着所有 Subject;可以看出它是 Shiro 的核心,它负责与后边介绍的其他组件进行交互,如果学习过 SpringMVC,你可以把它看成 DispatcherServlet 前端控制器;

  • Realm:域,Shiro 从 Realm 获取安全数据(如用户、角色、权限),就是说 SecurityManager 要验证用户身份,那么它需要从 Realm 获取相应的用户进行比较以确定用户身份是否合法;也需要从 Realm 得到用户相应的角色 / 权限进行验证用户是否能进行操作;可以把 Realm 看成 DataSource,即安全数据源。

也就是说对于我们而言,最简单的一个 Shiro 应用:

  1. 应用代码通过 Subject 来进行认证和授权,而 Subject 又委托给 SecurityManager
  2. 我们需要给 ShiroSecurityManager 注入 Realm,从而让 SecurityManager 能得到合法的用户及其权限进行判断。

从以上也可以看出,Shiro 不提供维护用户 / 权限,而是通过 Realm 让开发人员自己注入。

从内部

  • Subject:主体,可以看到主体可以是任何可以与应用交互的 “用户”;
  • SecurityManager:相当于 SpringMVC 中的 DispatcherServlet 或者 Struts2 中的 FilterDispatcher;是 Shiro 的心脏;所有具体的交互都通过 SecurityManager 进行控制;它管理着所有 Subject、且负责进行认证和授权、及会话、缓存的管理。
  • Authenticator:认证器,负责主体认证的,这是一个扩展点,如果用户觉得 Shiro 默认的不好,可以自定义实现;其需要认证策略(Authentication Strategy),即什么情况下算用户认证通过了;
  • Authorizer:授权器,或者访问控制器,用来决定主体是否有权限进行相应的操作;即控制着用户能访问应用中的哪些功能;
  • Realm:可以有 1 个或多个 Realm,可以认为是安全实体数据源,即用于获取安全实体的;可以是 JDBC 实现,也可以是 LDAP 实现,或者内存实现等等;由用户提供;注意:Shiro 不知道你的用户 / 权限存储在哪及以何种格式存储;所以我们一般在应用中都需要实现自己的 Realm;
  • SessionManager:如果写过 Servlet 就应该知道 Session 的概念,Session 呢需要有人去管理它的生命周期,这个组件就是 SessionManager;而 Shiro 并不仅仅可以用在 Web 环境,也可以用在如普通的 JavaSE 环境、EJB 等环境;所以呢,Shiro 就抽象了一个自己的 Session 来管理主体与应用之间交互的数据;这样的话,比如我们在 Web 环境用,刚开始是一台 Web 服务器;接着又上了台 EJB 服务器;这时想把两台服务器的会话数据放到一个地方,这个时候就可以实现自己的分布式会话(如把数据放到 Memcached 服务器);
  • SessionDAO:DAO 大家都用过,数据访问对象,用于会话的 CRUD,比如我们想把 Session 保存到数据库,那么可以实现自己的 SessionDAO,通过如 JDBC 写到数据库;比如想把 Session 放到 Memcached 中,可以实现自己的 Memcached SessionDAO;另外 SessionDAO 中可以使用 Cache 进行缓存,以提高性能;
  • CacheManager:缓存控制器,来管理如用户、角色、权限等的缓存的;因为这些数据基本上很少去改变,放到缓存中后可以提高访问的性能
  • Cryptography:密码模块,Shiro 提供了一些常见的加密组件用于如密码加密 / 解密的。

Shiro快速开始

Shiro配置

导入shiro依赖包

1
2
3
4
5
6
7
8
9
10
11
12
13
14
15
16
17
18
19
20
21
<dependencies>
<dependency>
<groupId>org.apache.shiro</groupId>
<artifactId>shiro-core</artifactId>
<version>1.8.0</version>
</dependency>
<!-- Shiro uses SLF4J for logging. We'll use the 'simple' binding
in this example app. See http://www.slf4j.org for more info. -->
<dependency>
<groupId>org.slf4j</groupId>
<artifactId>slf4j-simple</artifactId>
<version>1.7.21</version>
<scope>test</scope>
</dependency>
<dependency>
<groupId>org.slf4j</groupId>
<artifactId>jcl-over-slf4j</artifactId>
<version>1.7.21</version>
<scope>test</scope>
</dependency>
</dependencies>

shiro.ini

1
2
3
4
5
6
7
8
9
10
11
12
13
14
15
[users]
root = secret, admin
guest = guest, guest
presidentskroob = 12345, president
darkhelmet = ludicrousspeed, darklord, schwartz
lonestarr = vespa, goodguy, schwartz

# -----------------------------------------------------------------------------
# Roles with assigned permissions
# roleName = perm1, perm2, ..., permN
# -----------------------------------------------------------------------------
[roles]
admin = *
schwartz = lightsaber:*
goodguy = winnebago:drive:eagle5

Quickstart

1
2
3
4
5
6
7
8
9
10
11
12
13
14
15
16
17
18
19
20
21
22
23
24
25
26
27
28
29
30
31
32
33
34
35
36
37
38
39
40
41
42
43
44
45
46
47
48
49
50
51
52
53
54
55
56
57
58
59
60
61
62
63
64
65
66
67
68
69
70
71
72
73
74
75
76
77
78
79
80
81
82
83
84
85
86
87
88
89
90
91
92
93
94
95
96
97
98
99
import org.apache.shiro.SecurityUtils;
import org.apache.shiro.authc.*;
import org.apache.shiro.ini.IniSecurityManagerFactory;
import org.apache.shiro.mgt.SecurityManager;
import org.apache.shiro.session.Session;
import org.apache.shiro.subject.Subject;
import org.apache.shiro.lang.util.Factory;
import org.slf4j.Logger;
import org.slf4j.LoggerFactory;


/**
* Simple Quickstart application showing how to use Shiro's API.
*
* @since 0.9 RC2
*/
public class Quickstart {

private static final transient Logger log = LoggerFactory.getLogger(Quickstart.class);

public static void main(String[] args) {


Factory<SecurityManager> factory = new IniSecurityManagerFactory("classpath:shiro.ini");
SecurityManager securityManager = factory.getInstance();
SecurityUtils.setSecurityManager(securityManager);

// get the currently executing user:
//获取当前的用户对象:Subject
Subject currentUser = SecurityUtils.getSubject();

//通过当前对象拿到Session
Session session = currentUser.getSession();

session.setAttribute("someKey", "aValue");
String value = (String) session.getAttribute("someKey");
if (value.equals("aValue")) {
log.info("Retrieved the correct value! [" + value + "]");
}

// 测试当前用户是否被认证
if (!currentUser.isAuthenticated()) {

//Token 令牌
UsernamePasswordToken token = new UsernamePasswordToken("lonestarr", "vespa");
//设置记住我
token.setRememberMe(true);
try {
//执行登陆操作
currentUser.login(token);
} catch (UnknownAccountException uae) {
log.info("There is no user with username of " + token.getPrincipal());
} catch (IncorrectCredentialsException ice) {
log.info("Password for account " + token.getPrincipal() + " was incorrect!");
} catch (LockedAccountException lae) {
log.info("The account for username " + token.getPrincipal() + " is locked. " +
"Please contact your administrator to unlock it.");
}
// ... catch more exceptions here (maybe custom ones specific to your application?
catch (AuthenticationException ae) {
//认证异常
//unexpected condition? error?
}
}

//say who they are:
//print their identifying principal (in this case, a username):
log.info("User [" + currentUser.getPrincipal() + "] logged in successfully.");

//test a role:
if (currentUser.hasRole("schwartz")) {
log.info("May the Schwartz be with you!");
} else {
log.info("Hello, mere mortal.");
}

//粗粒度
//test a typed permission (not instance-level)
if (currentUser.isPermitted("lightsaber:wield")) {
log.info("You may use a lightsaber ring. Use it wisely.");
} else {
log.info("Sorry, lightsaber rings are for schwartz masters only.");
}

//细粒度
//a (very powerful) Instance Level permission:
if (currentUser.isPermitted("winnebago:drive:eagle5")) {
log.info("You are permitted to 'drive' the winnebago with license plate (id) 'eagle5'. " +
"Here are the keys - have fun!");
} else {
log.info("Sorry, you aren't allowed to drive the 'eagle5' winnebago!");
}

//all done - log out!
currentUser.logout();

System.exit(0);
}
}

SpringBoot整合shiro

pom.xml

1
2
3
4
5
6
7
8
9
10
11
12
13
14
15
16
17
18
19
20
21
22
23
24
25
26
27
28
29
30
31
32
33
34
35
36
<dependencies>

<!-- spring整合shiro的包 -->
<dependency>
<groupId>org.apache.shiro</groupId>
<artifactId>shiro-spring</artifactId>
<version>版本号</version>
</dependency>
<!--web-->
<dependency>
<groupId>org.springframework.boot</groupId>
<artifactId>spring-boot-starter-web</artifactId>
</dependency>
<!--thymeleaf-->
<dependency>
<groupId>org.thymeleaf</groupId>
<artifactId>thymeleaf-spring5</artifactId>
</dependency>
<dependency>
<groupId>org.thymeleaf.extras</groupId>
<artifactId>thymeleaf-extras-java8time</artifactId>
</dependency>

<dependency>
<groupId>org.springframework.boot</groupId>
<artifactId>spring-boot-starter-test</artifactId>
<scope>test</scope>
<exclusions>
<exclusion>
<groupId>org.junit.vintage</groupId>
<artifactId>junit-vintage-engine</artifactId>
</exclusion>
</exclusions>
</dependency>

</dependencies>

Shiro 配置类 config

1
2
3
4
5
6
7
8
9
10
11
12
13
14
15
16
17
18
19
20
21
22
23
24
25
26
27
28
29
30
31
32
33
34
35
36
37
38
39
40
41
package com.bobo.config; 
import org.springframework.context.annotation.Configuration;
//声明为配置类
@Configuration
public class ShiroConfig {

//创建 ShiroFilterFactoryBean
@Bean
public ShiroFilterFactoryBean getShiroFilterFactoryBean(@Qualifier("securityManager")DefaultWebSecurityMan ager securityManager){
ShiroFilterFactoryBean shiroFilterFactoryBean = new ShiroFilterFactoryBean();
//设置安全管理器
shiroFilterFactoryBean.setSecurityManager(securityManager); 、
/* 添加Shiro内置过滤器,常用的有如下过滤器:
anon: 无需认证就可以访问
authc: 必须认证才可以访问
user: 如果使用了记住我功能就可以直接访问
perms: 拥有某个资源权限才可以访问
role: 拥有某个角色权限才可以访问
*/
Map<String,String> filterMap = new LinkedHashMap<String, String>();
//"跳转目标","权限"
filterMap.put("/user/add","authc");
shiroFilterFactoryBean.setFilterChainDefinitionMap(filterMap);
return shiroFilterFactoryBean;
}

//创建 DefaultWebSecurityManager
@Bean(name = "securityManager")
public DefaultWebSecurityManager getDefaultWebSecurityManager(@Qualifier("userRealm")UserRealm userRealm){
DefaultWebSecurityManager securityManager = new DefaultWebSecurityManager();
//关联Realm
securityManager.setRealm(userRealm);
return securityManager;
}

//创建 realm 对象
@Bean
public UserRealm userRealm(){
return new UserRealm();
}
}

realm

1
2
3
4
5
6
7
8
9
10
11
12
13
14
15
16
17
18
19
20
21
package com.bobo.config; 
import org.apache.shiro.authc.AuthenticationException;
import org.apache.shiro.authc.AuthenticationInfo;
import org.apache.shiro.authc.AuthenticationToken;
import org.apache.shiro.authz.AuthorizationInfo;
import org.apache.shiro.realm.AuthorizingRealm;
import org.apache.shiro.subject.PrincipalCollection;
//自定义Realm
public class UserRealm extends AuthorizingRealm {
//执行授权逻辑
@Override protected AuthorizationInfo doGetAuthorizationInfo(PrincipalCollection principals) {
System.out.println("执行了=>授权逻辑PrincipalCollection");
return null;
}
//执行认证逻辑
@Override
protected AuthenticationInfo doGetAuthenticationInfo(AuthenticationToken token) throws AuthenticationException {
System.out.println("执行了=>认证逻辑AuthenticationToken");
return null;
}
}

Swagger

Swagger官方网站

Swagger 是一个规范且完整的框架,用于生成、描述、调用和可视化 RESTful 风格的 Web 服务。

Swagger 的目标是对 REST API 定义一个标准且和语言无关的接口,可以让人和计算机拥有无须访问源码、文档或网络流量监测就可以发现和理解服务的能力。当通过 Swagger 进行正确定义,用户可以理解远程服务并使用最少实现逻辑与远程服务进行交互。与为底层编程所实现的接口类似,Swagger 消除了调用服务时可能会有的猜测。

优势

  • 支持 API 自动生成同步的在线文档:使用 Swagger 后可以直接通过代码生成文档,不再需要自己手动编写接口文档了,对程序员来说非常方便,可以节约写文档的时间去学习新技术。
  • 提供 Web 页面在线测试 API:光有文档还不够,Swagger 生成的文档还支持在线测试。参数和格式都定好了,直接在界面上输入参数对应的值即可在线测试接口。

SpringBoot集成Swagger

Swagger配置

springboot版本使用2.5.6 swagger版本使用3.0.0

Swagger-UI配置

访问测试 :http://localhost:8080/swagger-ui/index.html ,可以看到swagger的界面

1
2
3
4
5
6
7
8
9
10
11
12
13
14
15
16
17
18
19
20
21
22
23
24
25
26
27
28
29
30
31
32
33
34
35
36
37
38
39
package com.bobo.swagger.config;
import org.springframework.context.annotation.Bean;
import org.springframework.context.annotation.Configuration;
import springfox.documentation.oas.annotations.EnableOpenApi;
import springfox.documentation.service.ApiInfo;
import springfox.documentation.service.Contact;
import springfox.documentation.spi.DocumentationType;
import springfox.documentation.spring.web.plugins.Docket;

/**
* @author renbo
* EnableOpenApi 开启Swagger2
*/
@Configuration
@EnableOpenApi
public class SwaggerConfig {
/**
* 配置Swagger 的 Docket的 Bean实例
*/
@Bean
public Docket docket(){
return new Docket(DocumentationType.SWAGGER_2)
.apiInfo(apiInfo());
}

// //配置Swagger信息 apiInfo
private ApiInfo apiInfo(){
Contact contact = new Contact("Bobo", "https://boyolo.github.io", "beau_renbo@163.com");
return new ApiInfo(
"BoBo Api Documentation",
"Boyolo Api Documentation",
"1.0",
"https://boyolo.github.io",
contact,
"Apache 2.0",
"http://www.apache.org/licenses/LICENSE-2.0",
new ArrayList());
}
}

swagger配置扫描接口以及开关

1
2
3
4
5
6
7
8
9
10
11
12
13
14
15
16
17
18
19
20
21
/**
* 配置Swagger 的 Docket的 Bean实例
*/
@Bean
public Docket docket(){
return new Docket(DocumentationType.SWAGGER_2)
.apiInfo(apiInfo())
//是否启动swagger ,如果为false,则swagger不能再浏览器中访问
.enable(false)
.select()
//RequestHandlerSelectors 配置要扫描接口的方式
//basePackage 指定要扫描的包 RequestHandlerSelectors.basePackage("com.bobo.swagger.controller")
//RequestHandlerSelectors.any() 扫描全部
//RequestHandlerSelectors.none() 都不扫描
//RequestHandlerSelectors.withClassAnnotation() 扫描类上的注解 参数是一个注解的反射对象
//RequestHandlerSelectors.withMethodAnnotation() 扫描方法上的注解
.apis(RequestHandlerSelectors.withMethodAnnotation(GetMapping.class))
//过滤什么路径
.paths(PathSelectors.ant("bobo/**"))
.build();
}

.select() 与 .build() 属于一套

中间除了.apis() 与 .paths() 不能再添加其他方法

思考

如何做使Swagger在生产环境中使用,在发布的时候不使用?

  • 判断是不是生产环境 flag == false
  • 注入enable(flag)

配置swagger API文档的分组

1
2
3
4
5
6
7
8
@Bean
public Docket docketA(){
return new Docket(DocumentationType.SWAGGER_2).groupName("A");
}
@Bean
public Docket docketB(){
return new Docket(DocumentationType.SWAGGER_2).groupName("B");
}

分布式系统

分布式系统(distributed system)是建立在网络之上的软件系统。正是因为软件的特性,所以分布式系统具有高度的内聚性和透明性。

RPC

RPC是远程过程调用(Remote Procedure Call)的缩写形式,是一种进程间的通信方式,是一种技术思想,而不是规范。SAP系统RPC调用的原理其实很简单,有一些类似于三层构架的C/S系统,第三方的客户程序通过接口调用SAP内部的标准或自定义函数,获得函数返回的数据进行处理后显示或打印。

基本流程
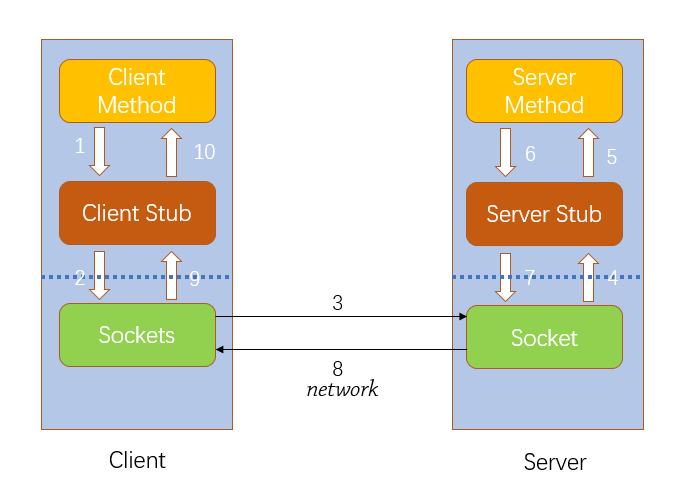
RPC两个核心模块:序列化、通讯

Dubbo

官方文档

Dubbo是一个分布式服务框架,致力于提供高性能和透明化的RPC远程服务调用方案,以及SOA服务治理方案。简单的说,dubbo就是个服务框架,如果没有分布式的需求,其实是不需要用的,只有在分布式的时候,才有dubbo这样的分布式服务框架的需求,并且本质上是个服务调用的东东,说白了就是个远程服务调用的分布式框架。
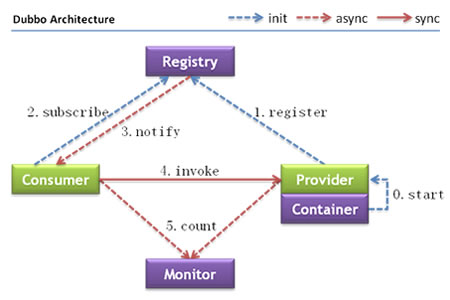
Provider: 暴露服务的服务提供方。;
Consumer: 调用远程服务的服务消费方;
Registry: 服务注册与发现的注册中心;
Monitor: 统计服务的调用次调和调用时间的监控中心;
Container: 服务运行容器。

zookeeper

ZooKeeper是一个分布式的,开放源码的分布式应用程序协调服务,是Google的实现,是Hadoop和Hbase的重要组件。它是一个为分布式应用提供一致性服务的软件,提供的功能包括:配置维护、域名服务、分布式同步、组服务等。

下载地址

3.5版本以后要下载后缀为bin.tar.gz的文件

更改默认配置文件名称 将conf目录下 zoo_sample.cfg 改为 zoo.cfg

1
2
3
4
5
> /apache-zookeeper-3.6.3-bin/bin/zkServer.sh start
.jenv/shims/java
ZooKeeper JMX enabled by default
apache-zookeeper-3.6.3- bin/bin/../conf/zoo.cfg
Starting zookeeper ... STARTED
1
2
3
4
> ./zkServer.sh stop 
ZooKeeper JMX enabled by default
Using config: zookeeper-3.4.10/bin/../conf/zoo.cfg
Stopping zookeeper ... STOPPED
查看评论