SpringBoot(基础配置及原理)
The scabbard is content to be dull when it protects the keenness of the sword.
刀鞘保护刀的锋利,它自己则满足于它的迟钝。
SpringBoot(基础配置及原理)
什么是Spring?
什么是SpringBoot?
SpringBoot 是 Pivotal 团队在 Spring 的基础上提供的一套全新的开源框架,其目的是为了简化 Spring 应用的搭建和开发过程。SpringBoot 去除了大量的 XML 配置文件,简化了复杂的依赖管理。
SpringBoot 具有 Spring 一切优秀特性,Spring 能做的事,SpringBoot 都可以做,而且使用更加简单,功能更加丰富,性能更加稳定而健壮。随着近些年来微服务技术的流行,Spring Boot 也成了时下炙手可热的技术。
SpringBoot 集成了大量常用的第三方库配置,SpringBoot 应用中这些第三方库几乎可以是零配置的开箱即用(out-of-the-box),大部分的 SpringBoot 应用都只需要非常少量的配置代码(基于 Java 的配置),开发者能够更加专注于业务逻辑。
特点
Spring Boot 具有以下特点:
独立运行的 Spring 项目
SpringBoot 可以以 jar 包的形式独立运行,SpringBoot 项目只需通过命令“ java–jar xx.jar” 即可运行。
内嵌 Servlet 容器
SpringBoot 使用嵌入式的 Servlet 容器(例如 Tomcat、Jetty 或者 Undertw 等),应用无需打成 WAR 包 。
提供 starter 简化 Maven 配置
Spring Boot 提供了一系列的“starter”项目对象模型(POMS)来简化 Maven 配置。
提供了大量的自动配置
SpringBoot 提供了大量的默认自动配置,来简化项目的开发,开发人员也通过配置文件修改默认配置。
自带应用监控
Spring Boot 可以对正在运行的项目提供监控。
无代码生成和 xml 配置
SpringBoot 不需要任何 xml 配置即可实现 Spring 的所有配置。
配置
maven中导入配置:spring-boot-starter-web、spring-boot-starter-test
点击跳转SpringBoot配置spring-boot-starter-web用于实现HTTP接口(该依赖中包含了SpringMVC)
spring-boot-starter-test用于编写单元测试的依赖包
什么是微服务?
一种软件开发技术-面向服务的体系结构(SOA)架构样式的一种变体,它提倡将单一应用程序划分成一组小的服务,服务之间互相协调、互相配合,为用户提供最终价值。
每个服务运行在其独立的进程中,服务与服务间采用轻量级的通信机制互相沟通(通常是基于HTTP的RESTful API)。
每个服务都围绕着具体业务进行构建,并且能够独立地部署到生产环境、类生产环境等。另外,应尽量避免统一的、集中式的服务管理机制,对具体的一个服务而言,应根据上下文,选择合适的语言、工具对其进行构建。
SpringBoot自动装配原理
SpringFactories 机制
SpringBoot 的自动配置是基于 SpringFactories 机制实现的。
SpringFactories 机制是 SpringBoot 中的一种服务发现机制,这种扩展机制与 Java SPI 机制十分相似。SpringBoot 会自动扫描所有 Jar 包类路径下 META-INF/spring.factories 文件,并读取其中的内容,进行实例化,这种机制也是 Spring-Boot-Starter 的基础。
自动配置的生效和修改
spring.factories 文件中的所有自动配置类(xxxAutoConfiguration),都是必须在一定的条件下才会作为组件添加到容器中,配置的内容才会生效。这些限制条件在 SpringBoot 中以 @Conditional 派生注解的形式体现。
点击跳转SpringBoot自动配置注解spring.factories
spring.factories 文件本质上与 properties 文件相似,其中包含一组或多组键值对(key=vlaue),其中,key 的取值为接口的完全限定名;value 的取值为接口实现类的完全限定名,一个接口可以设置多个实现类,不同实现类之间使用“,”隔开。

SpringFactories 实现原理
spring-core 包里定义了 SpringFactoriesLoader 类,这个类会扫描所有 Jar 包类路径下的 META-INF/spring.factories 文件,并获取指定接口的配置。在 SpringFactoriesLoader 类中定义了两个对外的方法,如下表。
| 返回值 | 方法 | 描述 |
|---|---|---|
| loadFactories(Class |
静态方法; 根据接口获取其实现类的实例; 该方法返回的是实现类对象列表。 |
|
| List |
loadFactoryNames(Class<?> factoryType, @Nullable ClassLoader classLoader) | 公共静态方法; 根据接口l获取其实现类的名称; 该方法返回的是实现类的类名的列表 |
SpringBoot自动装配流程
spring-boot-dependencies:核心依赖在父工程中
启动器
1
2
3
4
5
<!--SpringBoot 的启动场景-->
<dependency>
<groupId>org.springframework.boot</groupId>
<artifactId>spring-boot-starter</artifactId>
</dependency>SpringBoot会将所有的功能场景,都变成一个个的启动器。
要使用什么功能只要找到对应的启动器即可。
如:
1
2
3
4
5
6
7
8
9
10
11
<!--要使用什么功能,就启动对应的启动器-->
<dependency>
<groupId>org.springframework.boot</groupId>
<artifactId>spring-boot-starter-web</artifactId>
</dependency>
<dependency>
<groupId>org.springframework.boot</groupId>
<artifactId>spring-boot-starter-test</artifactId>
<scope>test</scope>
</dependency>主程序
1
2
3
4
5
6
7
8
9
package com.bobo;
import org.springframework.boot.SpringApplication;
import org.springframework.boot.autoconfigure.SpringBootApplication;
@SpringBootApplication
public class Springboot01HelloworldApplication {
public static void main(String[] args) {
SpringApplication.run(Springboot01HelloworldApplication.class, args);
}
}
@SpringBootApplication注解标注这个类是一个springboot应用 启动类下的所有资源被导入
1
2
3
4
5
6
7
8
9
@Target(ElementType.TYPE)
@Retention(RetentionPolicy.RUNTIME)
@Documented
@Inherited
@SpringBootConfiguration
@EnableAutoConfiguration
@ComponentScan(excludeFilters = { @Filter(type = FilterType.CUSTOM, classes = TypeExcludeFilter.class),
@Filter(type = FilterType.CUSTOM, classes = AutoConfigurationExcludeFilter.class) })
public @interface SpringBootApplication {}@SpringBootConfiguration
1
2
3
4
5
6
@Target({ElementType.TYPE})
@Retention(RetentionPolicy.RUNTIME)
@Documented
@Configuration //Spring配置类,说明这也是一个组件
@Indexed
public @interface SpringBootConfiguration {}@EnableAutoConfiguration
1
2
3
4
5
6
7
@Target(ElementType.TYPE)
@Retention(RetentionPolicy.RUNTIME)
@Documented
@Inherited
@AutoConfigurationPackage //自动配置包
@Import(AutoConfigurationImportSelector.class)
public @interface EnableAutoConfiguration {}
@EnableAutoConfiguration
@AutoConfigurationPackage:扫描并注册我们自己写的java类到spring容器
1
2
3
4
5
6
@Target(ElementType.TYPE)
@Retention(RetentionPolicy.RUNTIME)
@Documented
@Inherited
@Import(AutoConfigurationPackages.Registrar.class)
public @interface AutoConfigurationPackage {}向容器中导入了一个AutoConfigurationPackages.Registrar的实例对象
AutoConfigurationPackages.Registrar
1
2
3
4
5
6
7
static class Registrar implements ImportBeanDefinitionRegistrar, DeterminableImports {
@Override
public void registerBeanDefinitions(AnnotationMetadata metadata, BeanDefinitionRegistry registry) {
register(registry, new PackageImports(metadata).getPackageNames().toArray(new String[0]));
}
...
}其中
1
register(registry, new PackageImports(metadata).getPackageNames().toArray(new String[0]));其实就是完成了我们自己写的类的扫描。
获取到的是指定扫描包的路径,如果未明确指定,默认为主启动类所在的包名。
@Import(AutoConfigurationImportSelector.class):注册springboot提供的自动配置类到spring容器
1
2
public class AutoConfigurationImportSelector implements DeferredImportSelector, BeanClassLoaderAware,
ResourceLoaderAware, BeanFactoryAware, EnvironmentAware, Ordered {}将springboot提供好的自动配置装载进spring容器
AutoConfigurationImportSelector
将springboot提供好的自动配置装载进spring容器。
1
protected AutoConfigurationEntry getAutoConfigurationEntry(AnnotationMetadata annotationMetadata) {}这个方法是获取所有的自动配置类的实体
spring-boot在启动时,默认就装载了springboot写好的127个自动配置类实体(spring.factories),但是并没有启用,只有在引入相关依赖包的时候,这些自动配置才真正被启用,这种按需加载的原理是基于条件注解实现的
SpringApplication.run(Springboot01HelloworldApplication.class, args);
run方法
大多数应用程序上下文(如果不是全部的话)将实现SPI(服务提供者)接口。
这里封装了配置和生命周期方法,以避免它们被ApplicationContext客户端代码发现(避免配置文件被公开给使用者)。目前的方法只能在启动和关闭代码中使用。
1
2
3
4
5
6
7
8
9
10
11
12
public ConfigurableApplicationContext run(String... args) {···}
---------------------------------------------------------
//可配置的应用上下文
public static ConfigurableApplicationContext run(Class<?> primarySource,String... args) {
//重载传入 将要被加载的类放到一个对应的CLASS数组中
return run(new Class<?>[] { primarySource }, args);
}
---------------------------------------------------------
public static ConfigurableApplicationContext run(Class<?>[] primarySources,String[] args) {
//创建一个启动类传入
return new SpringApplication(primarySources).run(args);
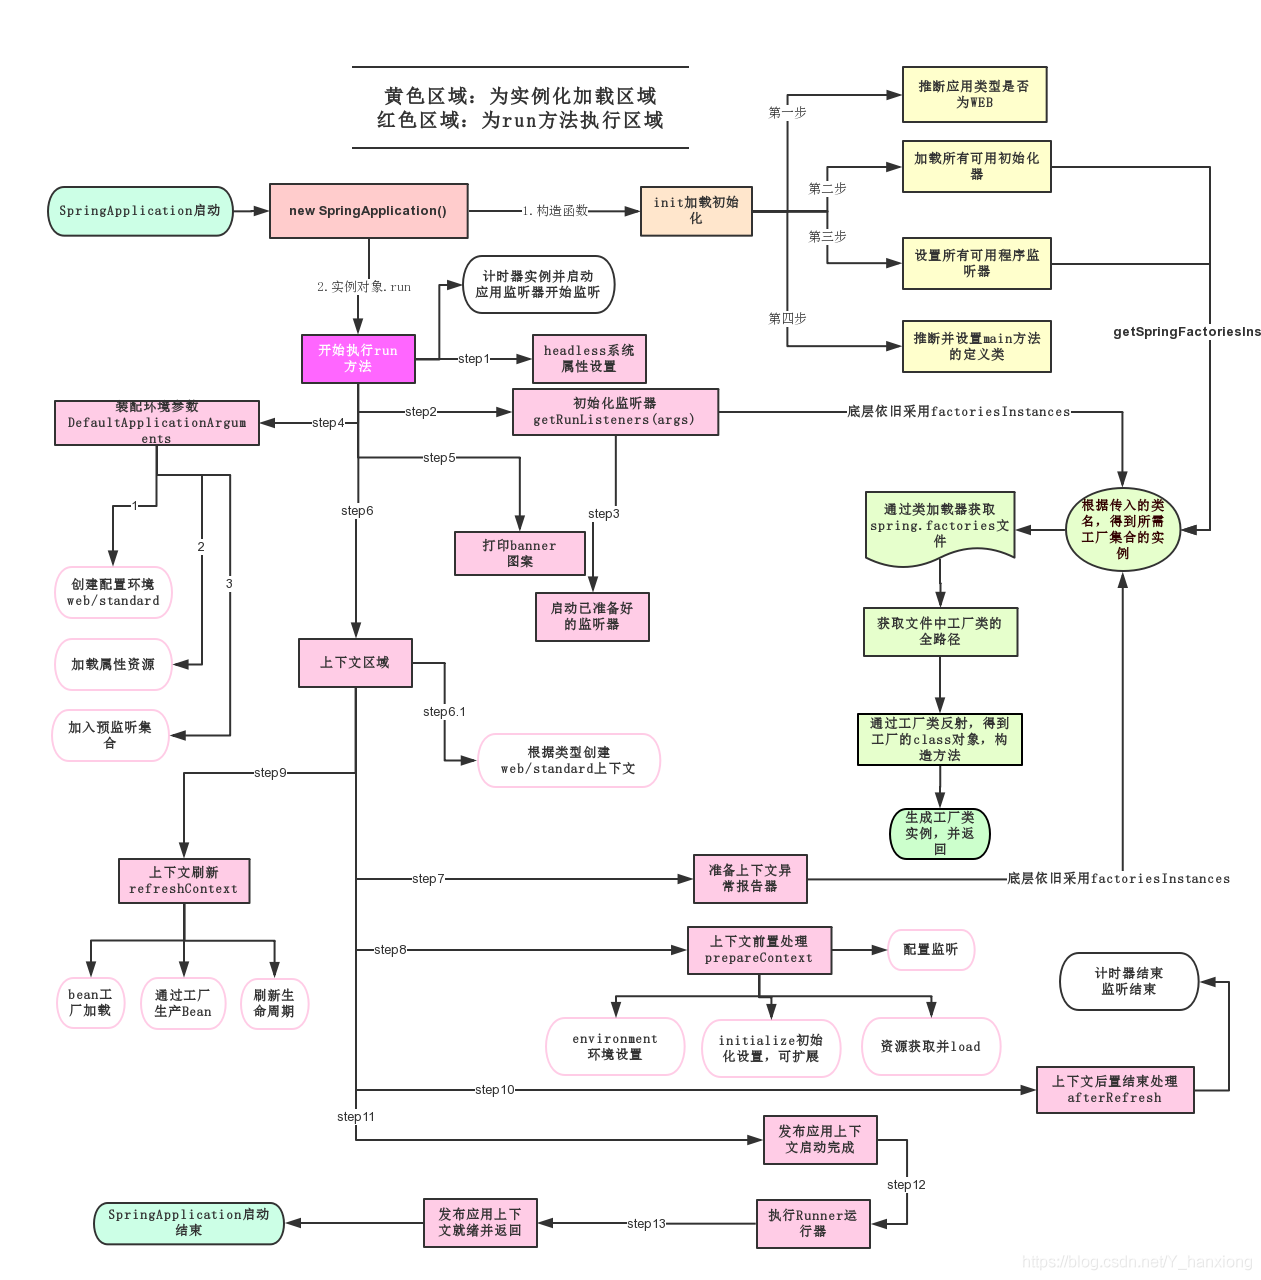
}run()方法启动Spring应用,实质上是为Spring应用创建并初始化Spring上下文
- 推断应用的类型是普通的项目还是Web项目
- 查找并加载所有可用初始化器,设置到initializers属性中
- 找出所有的应用程序监听器,设置到listeners属性中
- 推断并设置main方法的定义类,找到运行的主类
在启动时会加载三个jar将其对应的spring.factories工厂文件的接口实现类到MultiValueMap集合当中,并将对应加载器作为key,接口实现类作为value放到缓存当中
- spring-boot-2.1.3.RELEASE.jar!/META-INF/spring.factories
- spring-boot-autocinfiggure-2.1.3.RELEASE.jar!/META-INF/spring.factories
- spring-bean-5.1.5.RELEASE.jar!/META-INF/spring.factories
执行流程:
初始化监听器,以及添加到SpringApplication的自定义监听器;
发布ApplicationStartedEvent事件;
装配参数和环境,确定是web环境还是非web环境;
装配完环境后,就触发ApplicationEnvironmentPreparedEvent事件;
如果SpringApplication的showBanner属性被设置为true,则打印启动的Banner;
创建ApplicationContext,会根据是否是web环境,来决定创建什么类型的ApplicationContext;
装配Context的环境变量,注册Initializers、beanNameGenerator等;
发布ApplicationPreparedEvent事件;
注册springApplicationArguments、springBootBanner,加载资源等;
遍历调用所有SpringApplicationRunListener的contextLoaded()方法;
调用ApplicationContext的refresh()方法,装配context beanfactory等非常重要的核心组件;
查找当前ApplicationContext中是否注册有CommandLineRunner,如果有,则遍历执行它们;
发布ApplicationReadyEvent事件,启动完毕,表示服务已经可以开始正常提供服务了。通常我们这里会监听这个事件来打印一些监控性质的日志,表示应用正常启动了。
SpringBoot会触发其他的一些事件,这些事件按下列顺序触发:
(1)ApplicationStartingEvent:项目刚启动时触发,此时除了注册监听器和初始器之外,其他所有处理都没有开始;
(2)ApplicationEnvironmentPreparedEvent:上下文得到环境信息之后触发,此时上下文创建还没有创建;
(3)ApplicationPreparedEvent:bean的定义信息加载完成之后触发,此时bean还没有初始化;
(4)ApplicationReadyEvent:在所有bean初始化完毕,所有回调处理完成,系统准备处理服务请求时触发;
(5)ApplicationFailedEvent:启动过程出现异常时候触发。
2. **SpringApplication构造器**

   1
2
3
public SpringApplication(Class<?>... primarySources) {
  this(null, primarySources);
}


   1
2
3
4
5
6
7
8
9
10
11
12
13
14
15
16
17
18
19
public SpringApplication(ResourceLoader resourceLoader, Class<?>... primarySources) {
  //null
  this.resourceLoader = resourceLoader;
  //断言  PrimarySources 不能为空
  Assert.notNull(primarySources, "PrimarySources must not be null");
  //将传过来对象数组放到集合中 并为primarySources 赋值
  this.primarySources = new LinkedHashSet<>(Arrays.asList(primarySources));
  //推断webApplicationType 的枚举类型 一般都是SERVLET 标准webservice
  this.webApplicationType = WebApplicationType.deduceFromClasspath();
  //设置初始化器 读取一些控制器
  //获取实现了ApplicationContextInitializer初始化器的工厂并将其实例化 读取相应的一些控制器
  setInitializers((Collection) getSpringFactoriesInstances(
    ApplicationContextInitializer.class));
  //设置监听器 流程同上
  setListeners((Collection) getSpringFactoriesInstances(ApplicationListener.class));
  //存储带有main方法的启动对象(本例MyApplication)
  //deduceMainApplicationClass 获取推断主应用类 获取对应的MyApplication.class
  this.mainApplicationClass = deduceMainApplicationClass();
}


   [构造方法内容详解](https://blog.csdn.net/qq_42261668/article/details/103029333)
yaml
SpringBoot 提供了大量的自动配置,极大地简化了spring 应用的开发过程,当用户创建了一个 SpringBoot 项目后,即使不进行任何配置,该项目也能顺利的运行起来。当然,用户也可以根据自身的需要使用配置文件修改 SpringBoot 的默认设置。
SpringBoot 默认使用以下 2 种全局的配置文件,其文件名是固定的。
- application.properties
- application.yml
YAML 全称 YAML Ain’t Markup Language,它是一种以数据为中心的标记语言,比 XML 和 JSON 更适合作为配置文件。
想要使用 YAML 作为属性配置文件(以 .yml 或 .yaml 结尾),需要将 SnakeYAML 库添加到 classpath 下,SpringBoot 中的 spring-boot-starter-web 或 spring-boot-starter 都对 SnakeYAML 库做了集成, 只要项目中引用了这两个 Starter 中的任何一个,SpringBoot 会自动添加 SnakeYAML 库到 classpath 下。
语法
YAML 的语法如下:
- 使用缩进表示层级关系。
- 缩进时不允许使用 Tab 键,只允许使用空格。
- 缩进的空格数不重要,但同级元素必须左侧对齐。
- 大小写敏感。
- ‘#’表示注释
YAML 支持以下三种数据结构:
- 对象:键值对的集合,又称为映射(mapping)/ 哈希(hashes) / 字典(dictionary)
- 数组:一组按次序排列的值,又称为序列(sequence) / 列表(list)
- 字面量:单个的、不可拆分的值
YAML 字面量写法
字面量是指单个的,不可拆分的值,例如:数字、字符串、布尔值、以及日期等。
字面量直接写在键值对的“value”中即可,且默认情况下字符串是不需要使用单引号或双引号的。
1 | |
YAML 对象写法
在 YAML 中,对象可能包含多个属性,每一个属性都是一对键值对。
YAML 为对象提供了 2 种写法:
普通写法,使用缩进表示对象与属性的层级关系。
1 | |
1 | |
行内写法:
1 | |
YAML 数组写法
YAML 使用“-”表示数组中的元素,普通写法如下:
1 | |
行内写法
1 | |
复合结构
以上三种数据结构可以任意组合使用,以实现不同的用户需求
引用
& 锚点和 * 别名,可以用来引用:
1 | |
相当于:
1 | |
& 用来建立锚点(defaults),<< 表示合并到当前数据,* 用来引用锚点。
YAML 组织结构
YAML 文件可以由一或多个文档组成(也即相对独立的组织结构组成),文档间使用“—”(三个横线)在每文档开始作为分隔符,且个文档相互独立,互不干扰。同时,文档也可以使用“…”(三个点号)作为结束符(可选)。如果只是单个文档,分隔符“—”可省略。
1 | |
给属性赋值
@ConfigurationProperties:告诉 SpringBoot 将本类中的所有属性和配置文件中相关的配置进行绑定;
prefix = “ClassName”:配置文件中哪个下面的所有属性进行一一映射
例:
在全局配置文件 application.yml 中添加以下自定义属性
1
2
3
4
5
6
7
8
9
10
11
12person:
lastName: bobo
age: 18
boss: false
birth: 1997/07/09
maps: { k1: v1,k2: 12 }
lists:
‐ 111
‐ 222
dog:
name: 旺财
age: 5创建一个名为 Person 的实体类,并将配置文件中的属性映射到这个实体类上
1
2
3
4
5
6
7
8
9
10
11
12
13
14
15
16
17
18
19
20
21
22
23
24
25
26
27
28
29
30
31
32
33
34
35
36
37
38
39
40
41
42
43
44
45
46
47import org.springframework.boot.context.properties.ConfigurationProperties;
import org.springframework.stereotype.Component;
import lombok.AllArgsConstructor;
import lombok.Data;
import lombok.NoArgsConstructor;
import java.util.Date;
import java.util.List;
import java.util.Map;
/**
* 将配置文件中配置的每一个属性的值,映射到这个组件中
* 只有这个组件是容器中的组件,才能使用容器提供的@ConfigurationProperties功能;
*/
@Data
@AllArgsConstructor
@NoArgsConstructor
@Component
@ConfigurationProperties(prefix = "person")
public class Person {
private String lastName;
private Integer age;
private Boolean boss;
private Date birth;
private Map<String, Object> maps;
private List<Object> lists;
private Dog dog;
@Override
public String toString() {
return "Person{" +
"lastName='" + lastName + '\'' +
", age=" + age +
", boss=" + boss +
", birth=" + birth +
", maps=" + maps +
", lists=" + lists +
", dog=" + dog +
'}';
}
}
@Data
@AllArgsConstructor
@NoArgsConstructor
public class Dog {
private String name;
private String age;
}
@Value
只需要读取配置文件中的某一个配置时,可以通过 @Value 注解获取
1 | |
给属性赋值的两种方法
通过yaml文件赋值
第一种方法通过@ConfigurationProperties或@Value给属性赋值
通过注解@PropertySource给属性赋值
如果将所有的配置都集中到
点击跳转SpringBoot注解application.properties或application.yml中,那么这个配置文件会十分的臃肿且难以维护,因此我们通常会将与 SpringBoot 无关的配置(例如自定义配置)提取出来,写在一个单独的配置文件中,并在对应的 JavaBean 上使用 @PropertySource 注解指向该配置文件。例:
将与
person相关的自定义配置移动到src/main/resources下的person.properties中(注意,必须把 application.properties 或 application.yml 中的相关配置删除)1
2
3
4
5
6
7person.last-name=李四
person.age=12
person.birth=2000/12/15
person.boss=false
person.maps.k1=v1
person.maps.k2=14
person.lists=a,b,c在 Person 使用 @PropertySource 注解指向 person.properties
1
2
3
4
5
6
7
8
9
10
11
12
13
14
15
16
17
18
19
20
21
22
23
24
25
26
27
28
29
30
31
32
33
34
35
36
37
38
39package net.biancheng.www.bean;
import lombok.AllArgsConstructor;
import lombok.Data;
import lombok.NoArgsConstructor;
import org.springframework.beans.factory.annotation.Value;
import org.springframework.boot.context.properties.ConfigurationProperties;
import org.springframework.context.annotation.PropertySource;
import org.springframework.stereotype.Component;
import java.util.Date;
import java.util.List;
import java.util.Map;
@Data
@AllArgsConstructor
@NoArgsConstructor
@PropertySource(value = "classpath:person.properties")//指向对应的配置文件
@Component
@ConfigurationProperties(prefix = "person")
public class Person {
private String lastName;
private Integer age;
private Boolean boss;
private Date birth;
private Map<String, Object> maps;
private List<Object> lists;
@Override
public String toString() {
return "Person{" +
"lastName='" + lastName + '\'' +
", age=" + age +
", boss=" + boss +
", birth=" + birth +
", maps=" + maps +
", lists=" + lists +
'}';
}
}
配置文件
多 Profile 文件方式
在实际的项目开发中,一个项目通常会存在多个环境。
SpringBoot 的配置文件共有两种形式:.properties 文件和 .yml 文件,不管哪种形式,它们都能通过文件名的命名形式区分出不同的环境的配置,文件命名格式为:
1 | |
其中,{profile} 一般为各个环境的名称或简称,例如 dev、test 和 prod 等等。
在 项目 的 src/main/resources 下添加 4 个配置文件:
- application.properties/yml:主配置文件
- application-dev.properties/yml:开发环境配置文件
- application-test.properties/yml:测试环境配置文件
- application-prod.properties/yml:生产环境配置文件
激活配置文件
1 | |
1 | |
多 Profile 文档块模式
在 YAML 配置文件中,可以使用“—”把配置文件分割成了多个文档块,因此我们可以在不同的文档块中针对不同的环境进行不同的配置,并在第一个文档块内对配置进行切换。
1 | |
Spring Boot默认配置文件
通常情况下,SpringBoot 在启动时会将 resources 目录下的 application.properties 或 apllication.yml 作为其默认配置文件,我们可以在该配置文件中对项目进行配置,但这并不意味着 SpringBoot 项目中只能存在一个 application.properties 或 application.yml。
SpringBoot 项目中可以存在多个 application.properties 或 apllication.yml。
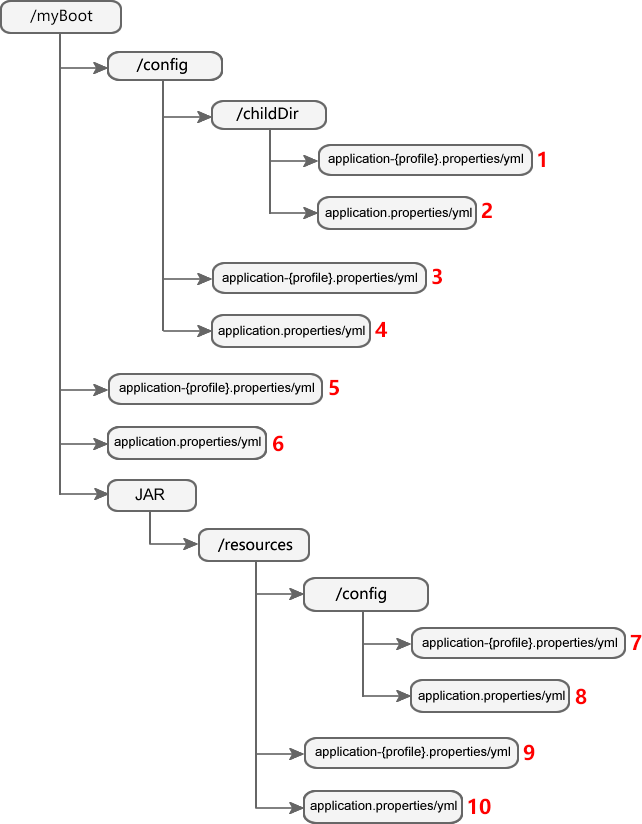
SpringBoot 启动时会扫描以下 5 个位置的 application.properties 或 apllication.yml 文件,并将它们作为 Spring boot 的默认配置文件。
- file:./config/
- file:./config/*/
- file:./
- classpath:/config/
- classpath:/
注:file: 指当前项目根目录;classpath: 指当前项目的类路径,即 resources 目录。
以上所有位置的配置文件都会被加载,且它们优先级依次降低,序号越小优先级越高。其次,位于相同位置的 application.properties 的优先级高于 application.yml。
高优先级配置会覆盖低优先级配置,形成互补配置,即:
- 存在相同的配置内容时,高优先级的内容会覆盖低优先级的内容;
- 存在不同的配置内容时,高优先级和低优先级的配置内容取并集。
SpringBoot 配置文件加载位置及优先级

- /myBoot:表示 JAR 包所在目录,目录名称自定义;
- /childDir:表示 JAR 包所在目录下 config 目录的子目录,目录名自定义;
- JAR:表示 Spring Boot 项目打包生成的 JAR;
- 其余带有“/”标识的目录的目录名称均不能修改。
- 红色数字:表示该配置文件的优先级,数字越小优先级越高。
这些配置文件得优先级顺序,遵循以下规则:
- 先加载 JAR 包外的配置文件,再加载 JAR 包内的配置文件;
- 先加载 config 目录内的配置文件,再加载 config 目录外的配置文件;
- 先加载 config 子目录下的配置文件,再加载 config 目录下的配置文件;
- 先加载 appliction-{profile}.properties/yml,再加载 application.properties/yml;
- 先加载 .properties 文件,再加载 .yml 文件。
- 本文作者:bobo
- 本文链接:https://boyolo.github.io/article/33757.html
- 版权声明:本博客所有文章均采用 BY-NC-SA 许可协议,转载请注明出处!

